Tabs, Ribbons and Notification Bar in SharePoint 2010
This time, we will show how to create a Ribbon with Visual Studio 2010 for SharePoint 2010 without writing server side.
Easily seen how to create a new Tab (1), how to build xml of Ribbon (2) and how to create a simple code of Notification Bar (3).
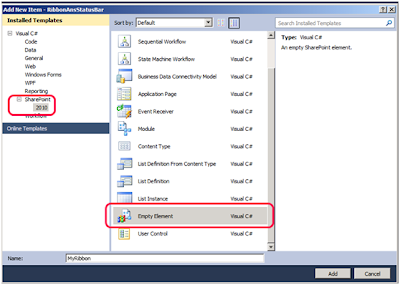
We will open an empty project in SharePoint 2010 and tied him to the site. After this, we will add to item-Empty Elements..
Elements.xml file, we add the following code:
<?xml version="1.0" encoding="utf-8"?>
<Elements xmlns="http://schemas.microsoft.com/sharepoint/%22>">
<Elements xmlns="http://schemas.microsoft.com/sharepoint/%22>">
<CustomAction Id="Roi.SharePoint.Ribbon.CustomTab" Location="CommandUI.Ribbon" RegistrationType="List" RegistrationId="101">
<CommandUIExtension>
<CommandUIDefinitions>
<CommandUIDefinition Location="Ribbon.Tabs._children">
<Tab Id="Roi.SharePoint.Ribbon.CustomTab" Title="My custom tab" Description="Groups and controls will go in here" Sequence="501">
<Scaling Id="Roi.SharePoint.Ribbon.CustomTab.Scaling">
<MaxSize Id="Roi.SharePoint.Ribbon.CustomTab.NotificationGroup.MaxSize" >
<Scale Id="Roi.SharePoint.Ribbon.CustomTab.NotificationGroup.Scaling.CustomTabScaling" GroupId="Roi.SharePoint.Ribbon.CustomTab.NotificationGroup"
Size="OneLarge" />
</Scaling>
<Groups Id="Roi.SharePoint.Ribbon.CustomTab.Groups">
<Group Id="Roi.SharePoint.Ribbon.CustomTab.NotificationGroup" Description="Contains notification items" Title="Notification messages" Sequence="52" Template="Ribbon.Templates.OneLargeExample">
<Controls Id="Roi.SharePoint.Ribbon.CustomTab.NotificationGroup.Controls">
<Button Id="Roi.SharePoint.Ribbon.CustomTab.NotificationGroup.Notify" Command="Roi.Command.Notify" Sequence="15" Image16by16="/_layouts/images/mewa_chartIndicator.gif" Image32by32="/_layouts/images/mewa_chartIndicatorb.gif"
Description="Uses the notification area to display a message." LabelText="Say hello" TemplateAlias="cust1"/>
</Controls>
</Group>
</Groups>
</Tab>
</CommandUIDefinition>
<CommandUIDefinition Location="Ribbon.Templates._children">
<GroupTemplate Id="Ribbon.Templates.OneLargeExample">
<Layout Title="OneLarge" LayoutTitle="OneLarge">
<Section Alignment="Top" Type="OneRow">
<Row>
<ControlRef DisplayMode="Large" TemplateAlias="cust1" />
</Row>
</Section>
</Layout>
</GroupTemplate>
</CommandUIDefinition>
</CommandUIDefinitions>
<CommandUIHandlers>
<CommandUIHandler Command="Roi.Command.Notify"
CommandAction="javascript: var notificationId = SP.UI.Notify.addNotification('Hello world');" />
</CommandUIHandlers>
</CommandUIExtension>
</CustomAction>
<CustomAction Id="Roi.Command.RemoveLastStatus.CheckEnable" Location="ScriptLink"
ScriptBlock=" var latestId ='' ;
function enableRemoveStatusButton()
{
if (latestId == '')
{
return false;
}
else
{
return true;
}
}" />
</Elements>
The xml contains two CustomAction. One for Ribbon (Location = "CommandUI.Ribbon" ), And the other to the status of the event. The event itself will be using the JavaScript call in CommandUIHandler.
The xml easy to understand, create Tab (or use located in an existing tab in 14Hive \ TEMPLATE \ GLOBAL \ XML \ CMDUI.XML), added a set of Ribbons (in this case one). And ribbon which makes a call to yellow Notification bar.
Now all we have to do is Deploy. Because we've connected it to the site when creating the project, it easy.
It will copy the deploy the feature, will it activation, all we'd have to do is see it working.
Nice and simple,
Roi


Comments
Post a Comment